
MEAL
PREPARATION, PART II
Planning
and Preparing Meals
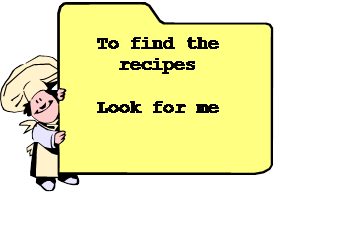
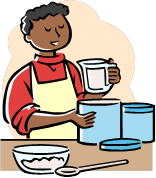
Lets Cook!
Plan ahead. During this unit you will prepare different
recipes. The recipes are included in
this unit as printable PDF files. You may wish to use them to make your own
cookbook. Review the recipes before you
begin so you can have the ingredients on hand when you are ready to prepare the
food.

Planning Meals
It is a good idea to plan meals in advance so you know you will have all the ingredients you need. Also planning meals ahead of time will give you time to make sure the meal will be nutritious, and is within your food budget. A menu is a list of foods included in the meal. To plan a menu, start with the main dish, also known as the entrée. Then you can think about side dishes that go with the entrée.
Plan meals in advance
to make sure:
- You have the ingredients you’ll need
- The meal is nutritious
- The meal is within your food budget
How to plan meals
- Start with the main dish (also known as the entrée)
- Add side dishes – like salad, vegetables, pasta
When planning meals,
ask these questions:
- How many people will be eating?
- How much food should I prepare?
ü Remember, children need smaller servings than teenagers.
- What foods do family members like?
- Do family members have special diets?
- Do any family members have food allergies?
- What is the number of servings recommended in each area of MyPyramid?
- Will everyone eat at the same time or will some eat later?
ü If this is the case, the food must be kept warm for a period of time.
- Does the meal have a variety of colors, sizes or shapes, temperatures, flavors, and/or textures?
ü Meals with all white foods or all hot foods are boring. A variety in each area is more interesting.
- Do I have the equipment I need?
ü Often suggestions for making substitutions are printed in cookbooks. For example, if you are working with chocolate, and the recipe requires a double boiler, you can create your own by using two pans and setting the smaller inside the larger one. Put water in the outside pan, and then place the smaller pan with the chocolate inside it. The water serves as a buffer, and the chocolate does not scorch as easily as it would if you had the pan sitting directly on the burner.
Tips for planning
and preparing meals
![MC900089522[1]](FCSFLIU16Meal_PreparationII_image010.png) When time is limited, plan meals that require little preparation or
short cooking times.
When time is limited, plan meals that require little preparation or
short cooking times.- Consider your food preparation skills.
ü As a beginner, you should start with foods easy to prepare, like packaged food.
ü As you get better at cooking, try new and more complicated dishes.
- When cooking, prepare extra portions.
ü Freeze them for a time when you are busy.
ü Use at another meal as leftovers or part of another dish. Extra pot roast can be used for vegetable soup.
- One dish meals often save time.
- Collect recipes that can be prepared in 30 minutes or less.
- Share meal preparation with family members so the person with extra time might get the meal started or cooked that day.
Preparing Foods
Preparing foods includes many different skills and tasks. Some of the common tasks are cutting, measuring, mixing, and cooking.

Cutting Foods
Cutting utensils include pizza cutters, knives, peelers, and kitchen shears. Small appliances that perform cutting tasks include blenders and food processors. Knives should match the task. Paring knives are small and often used to peel fruits and vegetables. Bread knives have serrated (saw tooth) edges. They are useful for cutting bread because the serrated edges do not mash the bread as much as a smooth knife.
|
|
|
|
|
|
|
|
Pizza Cutter |
Paring Knife |
Peeler |
Kitchen Shears |
Bread Knife |
Food Processor |
![MP900175443[1]](FCSFLIU16Meal_PreparationII_image014.png)
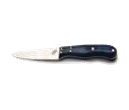
![MC900252165[1]](FCSFLIU16Meal_PreparationII_image018.png)
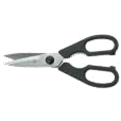
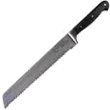
![MC900356935[1]](FCSFLIU16Meal_PreparationII_image024.png)
Cutting Tips
ü Keep knife blades sharp
ü Always use a cutting board to protect the counter, help prevent dulling the knife, and to keep the food from slipping.
ü Always cut away from yourself.
ü Never hold food in your hand when you are cutting.
ü Hold food with your fingers tucked back when you are cutting.
ü If you drop a knife, let it fall; it is not safe to try and catch it.
ü When washing knives, do not place them in sudsy dish water. The suds keep you from seeing where the knife blade is and you may get cut.
ü Buy knives with the blade riveted into the handle (tang); these blades are less likely to break when you apply pressure as you are cutting.
Several terms refer to cutting techniques. Each technique results in a different product.
ü Chopping is cutting food into small pieces.
ü Mincing is cutting into pieces as small as possible.
ü Grating is cutting food into small pieces or shreds using a grater.
ü Peeling or paring is taking skin off fruits or vegetables.
ü Slicing is cutting food into strips or pieces.
|
|
|
|
|
|
Chopping |
Grating |
Peeling |
Slicing |
![MC900040030[1]](FCSFLIU16Meal_PreparationII_image026.png)
![MC900112796[1]](FCSFLIU16Meal_PreparationII_image028.png)
![MC900112758[1]](FCSFLIU16Meal_PreparationII_image030.png)
![MC900347371[1]](FCSFLIU16Meal_PreparationII_image032.png)
Measuring
Ingredients
If you want the foods you cook to look and taste good, you need to know how to measure ingredients correctly. Using too much or too little of an ingredient can ruin the dish you are preparing. Follow these tips for perfect measuring.
|
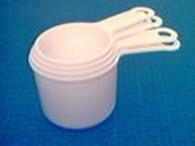
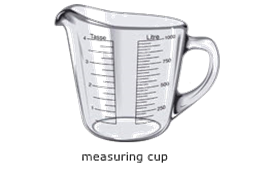
Use dry measuring
cups for dry ingredients like flour or sugar and liquid measuring cups for
liquids like water, oil or milk. |
|
|
|
|
|
Dry Measuring Cups The one cup mark is at the top of the cup Level off whatever you are measuring by sliding the straight edge of a knife across the top. |
Liquid Measuring Cups There is a spout and a space above the 1 cup mark. Measurements are marked on the side of the cup. |
|
Use measuring spoons to measure small amounts of both liquid and dry ingredients.
|
|
|
For liquids – pour the liquid into the spoon. Stop when the spoon is full. |
For dry ingredients - dip the spoon into the ingredient and fill to more than full. Then level off by sliding the straight edge of a knife across the top. |
|
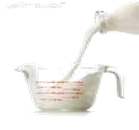
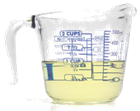
Measuring Liquids (water, milk, oil, juice, etc.) |
|
|
|
|
|
Set the cup on a level surface (like a counter or table) and pour in the liquid to be measured. |
Read the mark at eye level. You will probably have to bend down to do this. Do not lift the cup up to your eyes because you won’t get an accurate reading. |
|
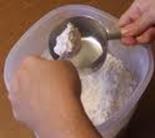
Measuring Flour |
|
|
Sift flour onto a plate or a sheet of waxed paper. |
|
|
Spoon flour lightly into measuring cup until it is overfull. Do not pack or shake down. |
|
|
Level off by
sliding the straight edge of a knife across the top. |
|
![MPj01756310000[1]](FCSFLIU16Meal_PreparationII_image042.jpg)

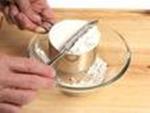
|
Experiment - Sifting flour adds air to the flour. Most recipes call for sifted flour, even if they don’t use the word ‘sifted’. Try this experiment. 1. Measure a cup of flour without sifting. 2. Then sift the flour you just measured and measure again. You should have flour left over. This is how much more flour you would be adding to your recipe. Too much flour causes baked products to be tough. |
Measuring Sugar
There are many different kinds of sugar, but the most common are white or granulated sugar, powdered or confectioner sugar, and brown sugar.
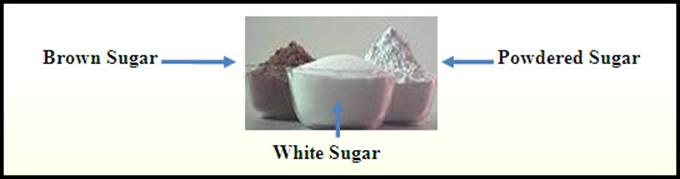
Measure white sugar by spooning into measuring cup until it is overfull. Level off by sliding the straight edge of a knife across the top.
Measure powdered sugar by spooning into measuring cup until it is overfull. Level off by sliding the straight edge of a knife across the top. If the powdered sugar is lumpy, you can sift it to get the lumps out.
|
|
|
|
Measure brown sugar by packing it into a measuring cup. |
Level off by sliding the straight edge of a knife across the top. |
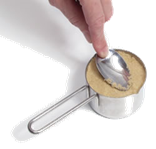
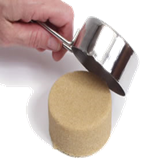
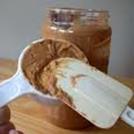
Measuring Fat
(shortening, margarine, butter, peanut butter)
|
|
|
|
Pack firmly into measuring cup. Be sure there are no air holes. Level off by sliding the straight edge of a knife across the top. Use a rubber scraper to scrape out the fat. |
When measuring sticks of margarine or butter, cut on the correct line. One stick is ½ cup. |

Measure grated cheese, chopped nuts, shredded coconut by spooning into measuring cup.
Measuring Tips
- If you need to measure ¼ cup of sugar, but you do not have any dry measuring cups, you could use a tablespoon. Since there are 16 tablespoons in 1 cup, you divide 16 by 4 and find that 4 tablespoons of sugar equal ¼ cup.
|
Measurement |
Equivalent |
|
1 tablespoon |
3 teaspoons |
|
1 cup |
16 tablespoons |
|
½ cup |
8 tablespoon |
|
1 cup |
48 teaspoons |
|
1 cup |
8 fluid ounces |
|
1 pint |
2 cups |
|
1 quart |
2 pints or 4 cups |
|
1 gallon |
4 quarts, 8 pints, or 16 cups |
|
1 pound |
8 ounces |
- Some recipes list ingredients by weight. You may have to use a kitchen scale to measure ingredients.
ü You place a piece of wax paper or plastic wrap on the scale.
ü Add food until it reaches the desired weight.
ü If it is necessary to measure the food on a plate or bowl, adjust the scale so it is set on zero when the bowl is on it. Then add enough of the needed ingredient until it reaches the desired weight.
![MC900040025[1]](FCSFLIU16Meal_PreparationII_image064.png)
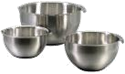
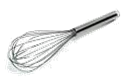
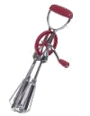
Mixing
To mix your food you will need a bowl and a utensil or piece of small equipment to do the stirring. Spoons, whisks, hand beaters, pastry blenders, electric mixers, and food processors are all used when mixing food.
|
|
|
|
|
|
|
|
|
Mixing
Bowls |
Wooden
Spoon |
Whisk |
Hand
Beater |
Pastry
Blender |
Electric
Mixer |
Rubber
Scrapers |


![MC900332466[1]](FCSFLIU16Meal_PreparationII_image076.png)

Mixing Tips
- Select a bowl which is the right size for the amount of ingredients you are using.
- To keep the mixing bowl from sliding around on the counter or table, place a damp towel underneath of it.
- Use a rubber scraper to get all of the batter mixture out of the bowl.
- When adding dry ingredients to liquid ingredients:
ü Add just a little bit at a time.
ü Stir until all the dry ingredients have disappeared and
then add more dry ingredients.
ü
Repeat until all of the ingredients have been added.
Some of the mixing
terms used in recipes are defined for you.
- Stir means to slowly mix in the ingredients with a spoon or wire whisk.
- Cut in means mix fat into dry ingredients, usually with a pastry blender.
- Cream means to combine ingredients until they are soft and creamy,
usually with an electric mixer.
- Fold means you combine ingredients by gently running a rubber spatula
down, through, and up - again and again until mixed.
Cooking Methods
The three most common methods for cooking food are
summarized below.
- The moist heat method uses water or steam to cook food. Moist heat is used for food such as rice because food becomes tender as it absorbs water. Moist heat also helps food become more flavorful, such as in soups and stews.
Moist heat methods include:
- Pressure cooking – a pressure cooker seals and cooks food in steam under pressure to “speed up” the cooking process.
§ Boiling – cooking food so bubbles rapidly rise to the surface and break; some nutrients are lost in the water during the boiling process.
- Poaching – cooking whole foods in a small amount of simmering water; eggs are often cooked in this fashion.
- Stewing – cutting food in small pieces and cooking in liquid.
- Steaming – cooking food over hot water, but only the steam touches it; food loses fewer nutrients than in the boiling process.
- Braising – browning food and
adding a small amount of liquid until it is cooked.
![MC900024436[1]](FCSFLIU16Meal_PreparationII_image080.png)
![MC900347427[1]](FCSFLIU16Meal_PreparationII_image082.png) The dry heat method
does not use water, and food is cooked uncovered. The food is brown and crisp on the
outside and moist on the inside.
The dry heat method
does not use water, and food is cooked uncovered. The food is brown and crisp on the
outside and moist on the inside.
Dry heat methods include:
§ Roasting and baking – cooking food in the oven in an uncovered pan.
Baking usually refers to cakes and cookies, while roasting refers to meats.
§ Broiling – cooking food directly over or under a heat source. The heat may be either above (broiling in the oven) or below the food (gas/charcoal grill). A broiler pan is used in the oven to allow juices and fats to drip away from the food. The door to the oven is kept slightly open during broiling.
- Cooking in fat – using fats, such as oil, shortening, or butter, to cook the food; nonstick cooking spray may replace the fats.
Cooking with fats includes:
§ Sautéing or pan frying – cooking food in small amounts of fat over a medium heat.
§ Deep-fat frying – cooking foods in enough fat to completely cover the food.
§ Stir-frying – cooking food quickly in a small amount of fat at a high temperature.
Let’s review the chart for each method of cooking, as well as the characteristics and the types of cooking associated with each method.
|
METHOD |
CHARACTERISTICS |
TYPES |
|
Moist Heat |
· Uses water or steam · Cooked covered · Makes food tender · Develops flavor · Takes time |
Pressure cooking – seals and cooks food in steam under pressure to “speed up” the cooking process. Boiling – cooking food so bubbles rapidly rise to the surface and break. Poaching – cooking whole foods in a small amount of simmering water; eggs are often cooked in this fashion. Stewing – cutting food in small pieces and cooking it in liquid. Steaming – cooking food over hot water, but only the steam touches it; food loses fewer nutrients than in the boiling process. Braising – browning food and adding a small amount of liquid until it is cooked. |
|
Dry Heat |
· No liquid · Cooked uncovered · Food is brown on outside and moist on the inside · Takes less time |
Roasting and baking – cooking food in the oven in an uncovered pan. Baking usually refers to cakes and cookies, while roasting refers to meats. Broiling and grilling – cooking food directly under or over heat. Broiling is usually done in the oven with the door open slightly and grilling is done on a gas, electric or charcoal grill |
|
Cooking in Fat |
· Uses oil, shortening, butter, or nonstick spray |
Sautéing or pan frying – cooking food in small amounts of fat over a medium heat. Deep-fat frying – cooking foods in enough fat to completely cover the food. Stir-frying – cooking food quickly in a small amount of fat at a high temperature. |
Preparing
Fruits & Vegetables
- Fresh fruits and vegetables should be washed under cool running water before you serve them.
- Some fruits turn a dark color after they have been cut. You can prevent this by sprinkling the fruit with “fruit fresh,” soaking it in lemon juice, wrapping it in plastic, or placing it in an airtight container.
![MC900237362[1]](FCSFLIU16Meal_PreparationII_image084.png) Potatoes should be scrubbed
with a vegetable brush.
Potatoes should be scrubbed
with a vegetable brush.- Salad greens should be washed under cool running water and then drained.
- Tear lettuce into bite size pieces; cutting with a knife causes lettuce to bruise and turn brown.
- To prevent lettuce or other greens from wilting, add dressing just before you serve the salad.
Cooking Fresh
Vegetables
To prevent loss of nutrients:
· Cook whole when ever possible – peeling and cutting cause loss of nutrients.
· Use a small amount of water.
· Use a lid.
· Cook only until fork-tender (easily cut with a fork). Don’t overcook.
Methods of Cooking
Fresh Vegetables
· Boiling- place 1-inch of water in a saucepan; heat to boiling; add vegetables; cover and cook on medium until fork-tender
· Steaming – place ½ inch of water in a saucepan; add vegetables to steamer basket and place in saucepan; cover; heat to boiling; reduce heat to low; cook until fork-tender
· Stir-frying - cooking quickly in a small amount of fat
· Baking – preheat oven; place vegetables in baking pan or directly on baking rack; cook until fork-tender (poke potatoes with the tines of a fork before baking to prevent the potato from exploding in the oven)
· Microwaving – place a small amount of water in a microwave safe dish; add vegetables; cover and cook until fork-tender; drain
![MC900040023[1]](FCSFLIU16Meal_PreparationII_image086.png)
Cooking Frozen
Vegetables
· Frozen vegetables are partially cooked
· Follow package directions
Cooking Canned
Vegetables
· Canned vegetables are completely cooked
· Heat the vegetables until hot
· Drain and serve
Lets Cook!
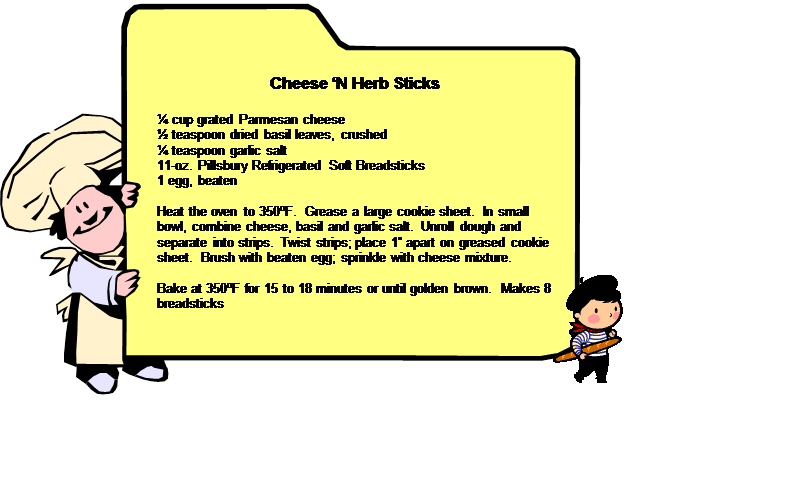
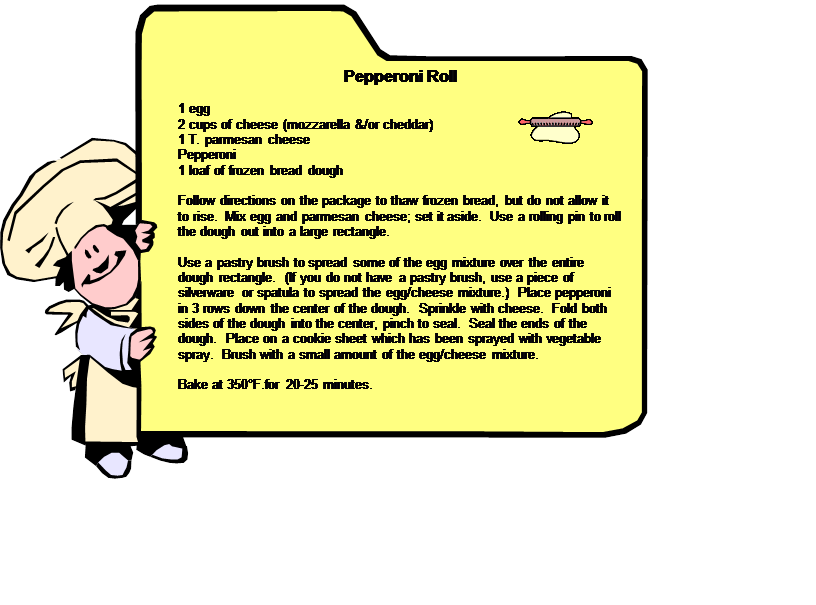
Prepare one of the recipes below.
· Tossed Salad
· Strawberry Julius
Be ready to answer questions about what you prepared. Print a copy of the recipes by clicking on the Recipe Card below. This document will be a PDF File which you can print and file in your cookbook..

Preparing Pasta and
Grain Products
Grain products, such as rice and breakfast cereals, absorb all the moisture they are cooked in and do not lose nutrients.
Cooking Pasta (macaroni, spaghetti and noodles)
· Read the directions on the box.
· Pasta doubles in size during cooking. 8 ounces of uncooked pasta = 16 ounces of cooked pasta.
·
![MC900296124[1]](FCSFLIU16Meal_PreparationII_image089.png) Use
2 quarts of water for every 8 ounces of pasta.
Use
2 quarts of water for every 8 ounces of pasta.
· Bring water to a boil.
· Add pasta slowly.
· Do not use a lid.
· Stir occasionally during cooking.
· Pasta is ready to eat when it is softened but still firm.
· When done, carefully pour pasta and hot water into a colander to drain.
· To help prevent loss of nutrients, do not rinse the pasta.
· Over-cooking pasta destroys the texture and nutritive value.
Cooking Rice (brown,
white, long grain and instant)
· Read the directions on the box.
·
![MC900215783[1]](FCSFLIU16Meal_PreparationII_image091.png) Rice
triples in size during cooking. 8 ounces
of uncooked rice = 24 ounces of cooked rice
Rice
triples in size during cooking. 8 ounces
of uncooked rice = 24 ounces of cooked rice
· Do not stir during cooking.
· Use a lid.
Making Quick Breads
· Quick breads include items such as muffins, biscuits, pancakes, coffee cake and nut breads.
·
![MP900175611[1]](FCSFLIU16Meal_PreparationII_image093.png) Do
not over-mix the batter.
Do
not over-mix the batter.
· Usually fast to make.
Lets Cook!
Prepare one of the recipes below.
· Biscuit Pizza
· Spanish Rice
Be ready to answer questions about what you prepared. Print a copy of the recipes by clicking on the Recipe Card below. This document will be a PDF File which you can print and file in your cookbook.

![MC900196418[1]](FCSFLIU16Meal_PreparationII_image096.png)
Preparing Diary
Products and Eggs
Cooking Milk, Cheese
and Eggs
· Use a low temperature and short cooking times to prevent toughness.
· Cut or grate cheese to shorten the cooking time.
· Never eat raw eggs.
·
![MC900264334[1]](FCSFLIU16Meal_PreparationII_image098.png) Cook
eggs until both the yolk and white are firm, not runny.
Cook
eggs until both the yolk and white are firm, not runny.
· Eggs can be poached, fried, simmered in the shell (soft or hard-cooked), scrambled, baked or made into omelets.
· If a recipe calls for an egg to be separated, you remove the yolk from the white.
· An egg separator can be used for this task.
ü Place the egg separator across the top of a small bowl. Crack the egg and pour it into the center of the egg separator. The yolk will stay in the center section, and the egg white will drain into the bowl.
· If no egg separator is available you can achieve the same results by:
ü Pouring the egg back and forth between the two egg shell halves. Do this over an empty bowl.
Lets Cook!
Prepare the recipe below.
· Macaroni and Cheese
Be ready to answer questions about what you prepared. Print a copy of the recipe by clicking on the Recipe Card below. This document will be a PDF File which you can print and file in your cookbook.

Preparing Meat, Fish
and Poultry
- Cook
meat, fish, and poultry at a medium temperature to prevent toughness.
- Moist
heat helps tenderize meat and poultry.
- Dry
heat methods are only for tender meat cuts and young tender poultry.
- Cook
meat, fish, and poultry to the right degree of doneness to be sure it is
safe to eat (refer to a meat doneness charts found in recipe books).
- Use a meat thermometer, which indicates the internal temperature of meat while it is cooking.
- When inserting the thermometer, be sure it is not against the bone or you will not have an accurate reading.
- Cook
fish 8-10 minutes per inch of thickness.
- Fish
is done when you can flake it easily with a fork.
- Always
cook poultry until well done.
- If a recipe calls for breading a food such as chicken or fish, cover the food item with a thin layer of flour, cornmeal, or crumbs before cooking it. You can roll the food in the coating or place the food and the coating in a plastic bag; seal the bag and shake it to coat the food.
Lets Cook!
Prepare the recipe below.
· Barbecued Chicken Wings
Be ready to answer questions about what you prepared. Print a copy of the recipe by clicking on the Recipe Card below. This document will be a PDF File which you can print and file in your cookbook.

Microwave Cooking:
How Microwave Ovens Cook Food
In conventional ovens, food is surrounded by heat. When food is cooked on the top of the range, heat is transferred from the burner to a pan to food. In the microwave oven, heat is produced inside the food. Microwaves cause the molecules in the food to move around creating friction, which heats and cooks the food. Microwaves only go about 2 ½ to 3 inches into the food. Heat continues through the food by conduction (passes the heat from one section to another). For this reason, food becomes warmer at the surface than in the center.
Characteristics of
Microwaves
A microwave is a short, high-frequency radio wave made by a magnetron tube. A stirrer blade or fan in the top of the microwave oven distributes microwaves throughout the oven and through the cooking dish and to the food. Microwaves are attracted to fat, water and sugar molecules; therefore they are attracted to food. They are reflected by metal which means they will not pass through it. Microwaves pass through glass, paper, ceramic, plastic, wood and straw.
Power vs. Temperature
When cooking with a conventional range, a temperature setting is selected (such as high, medium or low). With a microwave oven there are power settings. Almost all microwaves have at least two settings, full power (100%) and defrost (30%). Many offer power settings ranging from 10% to 100%. When a power setting 100% is selected microwaves are produced 100% of the time the microwave is on. When a less than full power level is selected, the oven turns on and off only producing microwaves part of the time. This allows for more even cooking.
For example: You can see the difference by comparing a pound of ground beef defrosted on full power to one that has been defrosted on low power.
· At high power the meat will start to cook on the outside by the time the center is defrosted.
· At the lower power setting, fewer or no areas will have begun to cook by the time the meat is defrosted.
What power settings are called depends on the brand of microwave oven. Some examples are WARM, DEFROST, SIMMER, BAKE, REHEAT, HIGH, and LOW, or MEDIUM-LOW, MEDIUM, MEDIUM HIGH, and HIGH.
Caution: Using the high power setting for some foods may result in tough, dry food with a rubbery texture. Foods high in protein are better if cooked on lower power settings.
Microwave Cooking
Techniques
Moving food for even
cooking
Because microwaves enter food unevenly, it is important to stir or move food during cooking so the food will cook evenly. Arranging foods in the microwave in a circle with thicker parts to the outside will help foods to cook evenly. Most microwaves come with turntables that keep the food moving.
Standing time
Because microwave ovens cook food through the vibrations of molecules and conduction of heat toward the center, many foods continue to cook after they are removed from the oven. When a recipe includes a period of “standing time” it means that the food is not completely cooked when removed from the microwave, but will continue to cook during the standing time.
Browning of foods
Because heat is produced differently in the microwave than by conventional methods, foods do not brown in the same way. In order for there to be some surface browning:
- The food must contain a good deal of fat (such as bacon)
- The food must cook for longer than 15 minutes (such as a roast)
- Browning agents (sauces) need to be used
- Use special browning dishes (when preheated act as a grill)
Covering
The following is a list of reasons for covering foods while cooking in the microwave oven:
- To keep foods moist
![MC900311286[1]](FCSFLIU16Meal_PreparationII_image106.png) To retain (keep) steam for
faster cooking
To retain (keep) steam for
faster cooking- To prevent spattering
- In some cases, to absorb (soak up) extra moisture so foods don’t get soggy
Good covers for foods
in microwave ovens are:
· Paper towels or napkins; wrapping bread in paper towels keeps it from getting soggy.
· Waxed paper allows some steam to escape while keeping in moisture.
· Dishes with lids.
· Microwave-safe plastic wrap can be used.
Caution: Because plastic wrap forms a tight seal; always pierce the top of the plastic wrap or turn back one corner to prevent the build-up of steam.
Cooking times
Microwaves cook food quickly. How long food is cooked depends on several different things.
· Foods high in water, fat, and sugar heat quickly.
· Denser foods (roast) take longer to cook in the microwave oven.
· It takes longer to cook a large amount of food.
· Unevenly shaped foods cook unevenly. If food has thinner and thicker sections, place the thinner sections toward the center of the oven and the thicker parts toward the outside. Placing them like the spokes of a bike wheel helps.
· Starting temperature - Refrigerated or frozen foods take more time to cook than those starting at room temperature.
· Keep the microwave oven clean. Food splashed on the sides, top, and bottom of the oven will increase cooking times.
Additional cooking
tips
- Season food after microwaving because salt attracts microwaves.
- Pasta products are not often cooked in microwave ovens because they take as long to cook in microwaves as they do on stovetops. Pasta products need time to absorb water so they soften.
- Breads can be baked in microwaves, but they will not brown well.
- Eggs can not be cooked in the shell in microwaves because they will explode.
Microwave Cookware
Microwaves pass through glass, plastic, ceramic, wood, paper, and straw so they can be as microwave cookware. There are a few cautions, however. Once microwave cooking begins in the food, heat is transferred from the food to the cookware. Therefore, materials like soft plastic and Styrofoam may melt when used for long cooking periods. When buying cookware, look for labels which state the utensils are “microwave safe” or “suitable for the microwave”.
Metal – Generally, metal utensils should not be used in the microwave. Use of metals can cause arcing (a sparking, which can ruin the oven and/or cause a fire). Some metals can be used safely, however, if directions are carefully followed. Aluminum foil can be used for shielding (using small strips of foil to cover certain areas to prevent overcooking).
Caution: The foil should not come close to, or touch the walls of the oven and there should be more food not covered than covered.
Caution: Dishes that are not microwave safe may melt or shatter in the microwave. Always check to be sure they are safe. To do this:
· Put ½ cup water in the container and put it in the oven on high power for 1 minute.
· Check to see if the water is hot.
ü If the water is hot and the dish is not, it is good to use.
ü If the dish is hot and water is not, do not use it because the dish is absorbing the microwaves and it may crack.
Microwave Safety
Microwave ovens must be thoroughly tested and meet the standards of several regulation agencies (Federal Communications Commission, Underwriters Laboratory, Department of Health, Education and Welfare, and U.S. Food and Drug Administration). Therefore, they can be considered safe to use. Following certain safety measures will help to ensure safe microwave cooking.
Exposure to microwave
energy
- Do not tamper with safety interlocks.
- Do not operate the oven if it is damaged (door bent, hinges and latches broken, door seal cracked).
- Do not allow grease to build up around door seal.
- Microwave ovens must be grounded with a three-prong plug. Do not use extension cords.
Cooking precautions
- Steam builds up quickly during microwave cooking, so use care when removing coverings. Always open the edge away from you to allow the steam to escape and prevent you from getting burned.
- Although
direct heat is not produced in the microwave; the food can get very hot
and transfer that heat to the cooking utensil. Pot
holders should be used when removing hot dishes from the microwave.
- Foods covered with skin or sealed in plastic should be pierced with a fork or make slits with a knife. This prevents steam from building up inside the food and possibly causing it to explode.
When Using a
Microwave
|
DO use the correct power setting DO remove covers carefully DO use pot holders on hot dishes DO wipe up spills right away DO follow directions carefully DO move food by stirring, turning, or rotating |
DO NOT use dishes with metal trims DO NOT use soft plastic cups or dishes DO NOT turn on if empty DO NOT use to fry foods DO NOT cook an egg in a shell DO NOT cook popcorn that is not made for the microwave |
Advantages and
Disadvantages of Microwave Cooking
|
Advantages |
Disadvantages |
|
· Fast · Easy to clean – spatters can be easily wiped off · Does not require special installation and can be plugged into any standard electric outlet · Cost less to run than a conventional range · Leftovers taste better reheated in the microwave compared to conventional methods · Defrosts food quickly · Less loss of nutrients during cooking · Is cool – does not heat up the kitchen · Energy efficient |
· Does not brown foods the same way conventional cooking does · Can not fry foods in the microwave · Eggs can not be cooked in the shell (will burst) · Does not work as efficiently when cooking large quantities of food · Causes loss of counter space in some kitchens · Cannot use metal cookware · Can not be used for canning |
Lets Cook!
Prepare the recipe below.
· Scrambled Eggs
Be ready to answer questions about what you prepared. Print a copy of the recipe by clicking on the Recipe Card below. This document will be a PDF File which you can print and file in your cookbook.
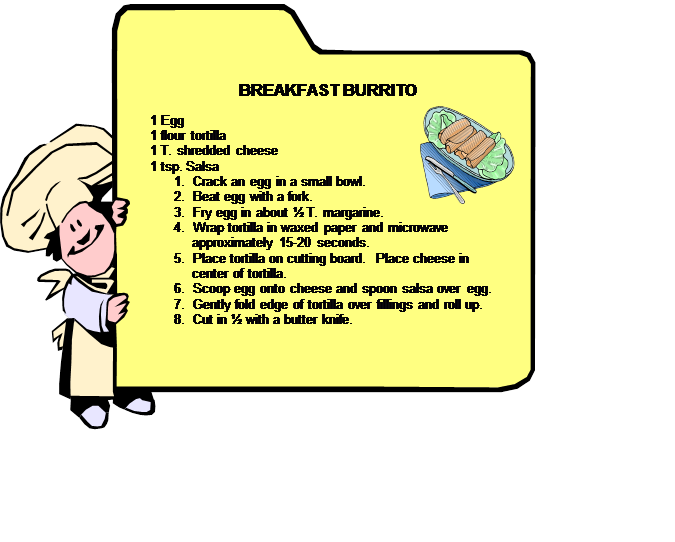
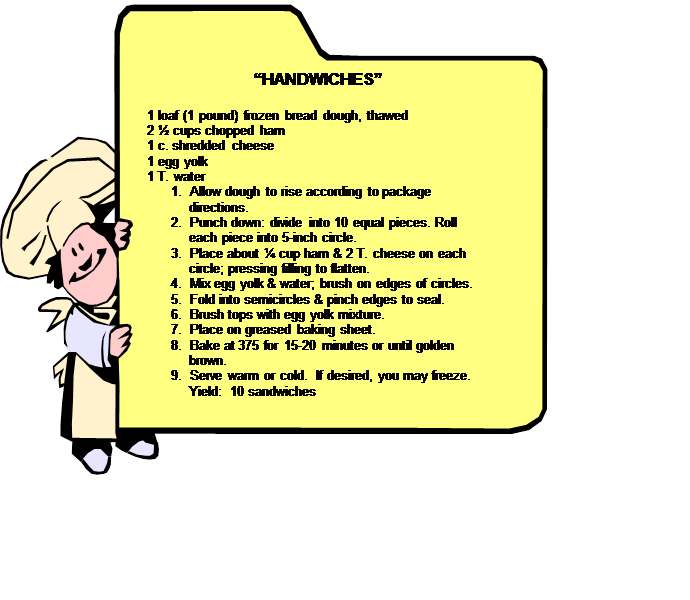
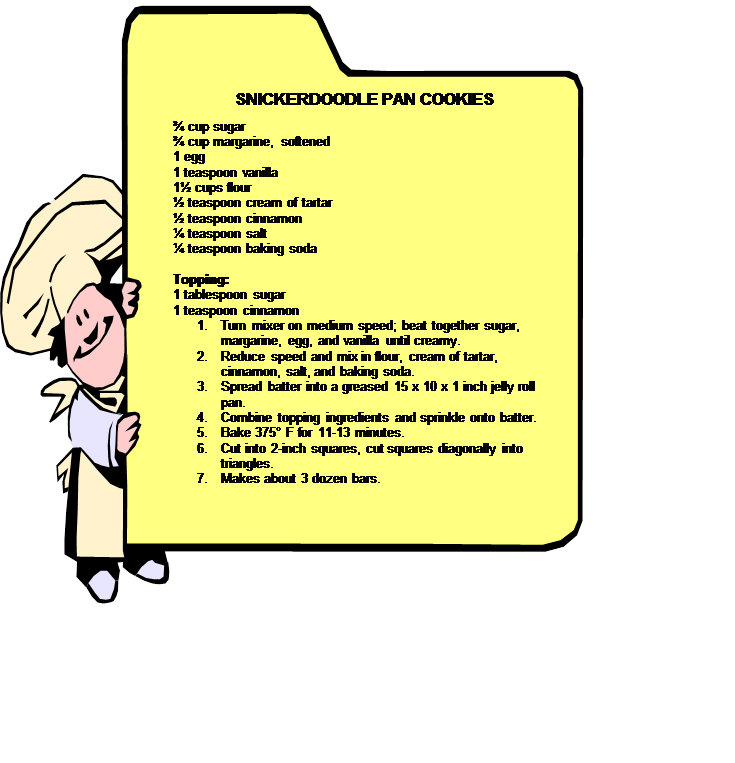
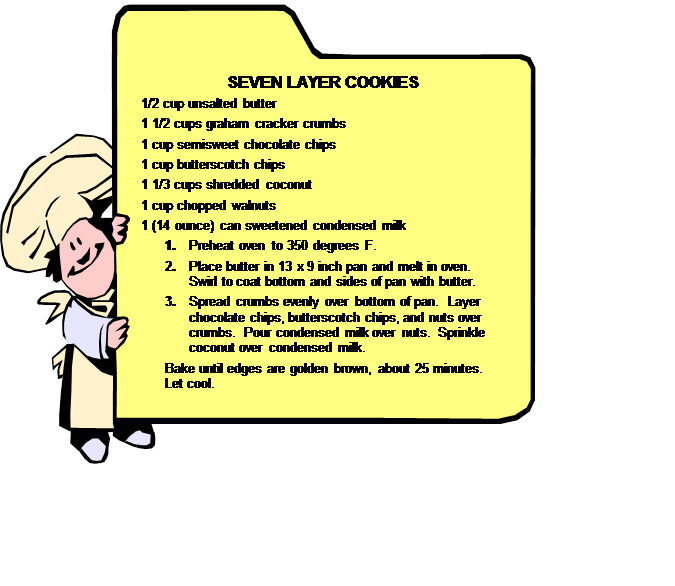
Lets
Cook!
Prepare one of the recipes below.
Be ready to answer questions about what you prepared. This document will be a PDF File which you can print and file in your cookbook.
![j0356792[1]](FCSFLIU16Meal_PreparationII_image113.gif)
![j0295163[1]](FCSFLIU16Meal_PreparationII_image115.gif)
![]()
![]()

![hh01010_[1]](FCSFLIU16Meal_PreparationII_image123.png)
 |
| Unit 16 Meal Preparation, Part II (Unscramble) Worksheet |
| Unit 16 Meal Preparation (Advance Organizer) Worksheet |